¶ Authenticate
To access the Application Hub, you need to authenticate. You sign in with your account in the DUNIA portal and click the “Launch Application Hub” button from the Build > Application Hub section. You should be redirected to the Application Hub site and see your Dashboard page.
¶ Access data
Data that is available to you can be accessed from the “My Datasets” section in the left menu:
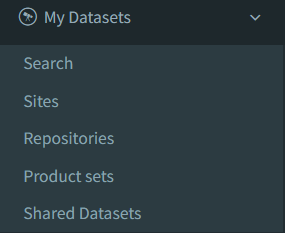
From the entries under this menu, you can do the following:
• “Search”: do queries using an area of interest, a time interval, and various other parameters (depending on the search context) for satellite acquisitions from remote services.
• “Sites”: organize your frequently used areas of interest and time intervals to quickly use them in searches.
• “Repositories”: visualize and manage your files and products on your DUNIA workspace.
• “Product sets”: group together EO products of the same type (i.e., from the same mission and of the same processing level) so that you can use them in processing workflows.
• “Shared datasets” (coming soon): manage the datasets that you have published / shared with other users of the platform.
¶ Search
The page allows you to query for EO products from various collections managed by different entities. By default, the initially displayed collections are those from CreoDIAS, the cloud platform onto which the Application Hub is hosted.
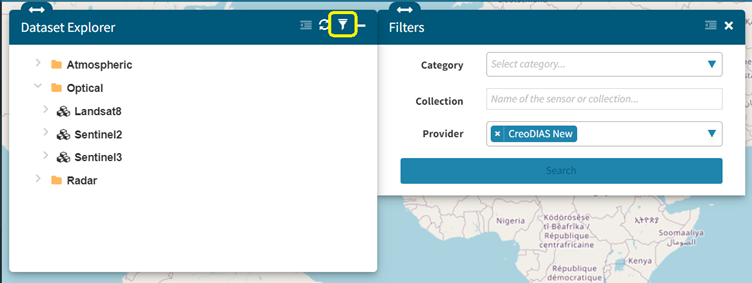
The collections are organized by the type of sensor and by mission. You can filter what is displayed in the Dataset Explorer tree by going to the Filters window (clicking the highlighted icon).
Selecting an entry from the tree walks you to the query parametrization window:
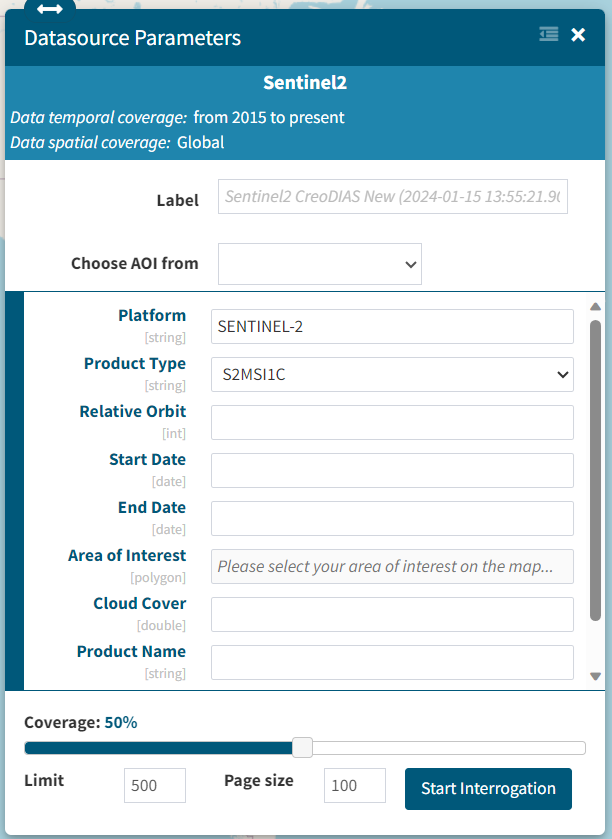
The parameters may be different for each collection. Nevertheless, there are some common parameters that should be set, such as the Start Date, the End Date, and the Area of Interest. It is advisable to enter a reasonable time interval (up to 3 months), otherwise the remote collection provider may time out.
While the parameters are specific to the selected collection, a little note on the Coverage parameter: it refers to the percentage of intersection between an EO product and the area of interest. If the area of interest is smaller in size than the extent of a product, the percentage refers to the area of interest (i.e., the product covers at least the specified percentage of the area of interest). If the area is larger than the extent of a product, the percentage refers to the extent of the product (i.e., the area of interest intersects at least the specified percentage of the product).
¶ Drawing the area of interest
The area of interest can be drawn directly on the map as a rectangle. You can further change its shape by toggling the Modify button and inserting points along the shape:
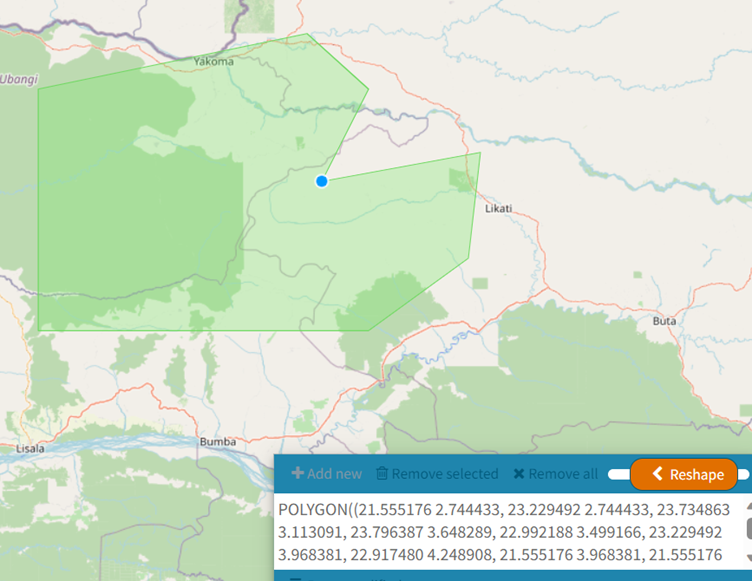
Or, if you have the well-known text of your area, you can directly paste it in the lower right box and parse it.
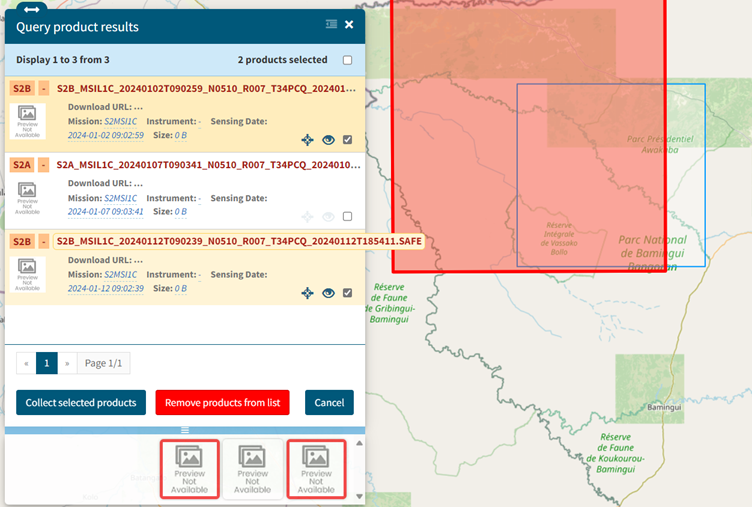
Note: The products retrieved from CreoDIAS New are not downloaded. A link to them is made available in your workspace and thus they don’t count towards your storage quota. Products retrieved from other sources will be downloaded and they will be counted towards your quota.
¶ Sites
A site is a convenient placeholder of an area of interest and a time interval. If you use frequently the same AOI and time interval, a site will spare you from drawing each time the AOI.
You can add a new site by clicking the “+” button from the top left corner of the widget.
Then, you can draw the AOI as for the search page, specify a name, a description, and the start and end of the period.
¶ Repositories
This is where you browse and manage your datasets, either retrieved from searches, uploaded by yourself, or resulted from processing workflows.
By default, you have two repositories: a LOCAL one, which is used for intermediate results of the processing tasks, and a SWIFT one, which will be used to store the processing results. This latter is shared between the Application Hub and the Sandbox.
A repository contains data organized as files and folders. A special notion is that of a “product”: a product can be either a single file or an entire subfolder. It has more metadata than a regular file.
A repository can be browsed using an Explorer-like interface:
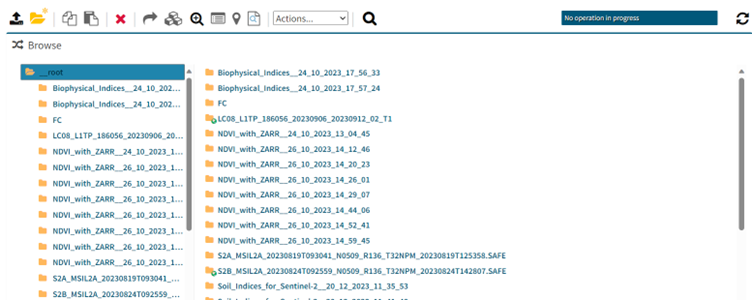
When you select an item in the left tree, several actions are available:
• Upload: you can upload a file in the current folder.
• New Folder: you can create a subfolder in the current folder.
When you select an item in the right tree, additional actions are available:
• Copy: mark the selection as ready to be copied in another repository.
• Paste: copies a previous copy selection in the current repository and folder.
• Delete: deletes the selected item from the repository.
• Product Set: creates a product set from the selected item(s).
• Inspect: looks for known products in the current folder. Currently Sentinel-1/2/3, Landsat-8 and single GeoTIFF products are supported.
• Properties: display the attributes of the selected item.
• View on map: if the selected item is a product or a raster of a known format, it will be displayed on a map.
• Open file: displays the contents of text files.
• Actions: several additional actions can be performed on an item:
o Convert to COG: applies for GeoTIFF files only.
o Convert to ZARR: tries to convert the selected item in the ZARR format.
o Move: moves the selected item in another location in the same repository.
o Zip: creates a zip archive from the selected item.
o Unzip: if the selected item is a zip file, it extracts its contents in the current location.
• Search: applies a filter on the items in the current folder.
¶ Process data
Data processing features are grouped under the section “My Workflows”:
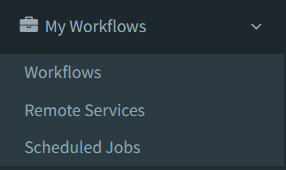
They are as follows:
• “Workflows”: compose processing workflows by joining various processing components from well-known EO processing toolboxes.
• “Remote Services”: invoke 3rd party web services to get results to your workspace.
• “Scheduled Jobs”: configure a workflow to be executed on a schedule.
¶ Workflows
A workflow is a DAG (directed acyclic graph) formed from different processing modules.
This section lists all the workflows you have created together with the workflows that you have subscribed to in the Dunia Marketplace. You can create a new workflow by clicking on the “+” top-left icon (the different fields are explained below for the Edit description action).
Several actions are available for a particular workflow:
• Edit description
You can edit the name, description and the tags associated with the workflow.
Furthermore, you can lock the workflow to prevent changes to its definition. Once locked, you can publish the workflow to your place in the DUNIA Marketplace, where you can opt to make it available for subscription to other users.
• Edit workflow: it will open the workflow editor, detailed in the next sections.
• Clone workflow: duplicates the current workflow, creating a new independent copy.
• Start execution: will trigger the execution of the workflow, detailed in the next sections.
• Generate script: allows exporting the workflow definition in other formats (such as CWL and bash script).
• Delete current workflow: removes the workflow from the active workflows list.
• Show execution results: displays all the outcomes of the past executions of this workflow.
• Trace execution: displays a timeline with the executions (and their individual statuses) of this workflow.
The workflow editor is like a canvas for dragging, dropping and connecting processing modules:
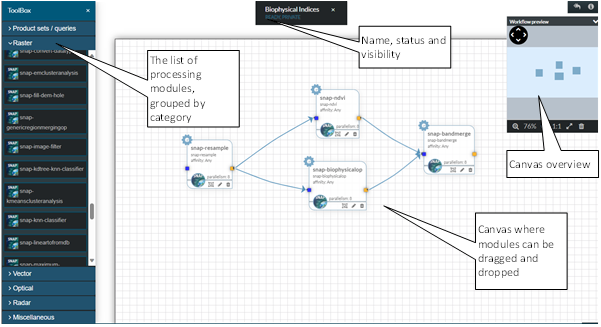
The modules are grouped in categories. The available categories are:
• Product sets / queries: contains the available product sets and saved queries, that can be used as inputs for a workflow.
• Raster: groups the modules that can process general raster files.
• Vector: groups the modules that can process general vector files.
• Optical: groups the modules that can process optical EO products, such as from Sentinel-2, Landsat-8, etc.
• Radar: groups the modules that can process SAR EO products, such as from Sentinel-1.
• Miscellaneous: modules that were not put in any of the above categories
It is advisable not to mix modules from different thematic categories (such as Optical with Radar) since they may not work together. You can use though modules from thematic categories with modules from general categories (for example Optical with Raster).
A module has input ports (the blue dots), output ports (the yellow dots) and parameters. To connect modules, you simply click on an output port of a module, hold the mouse button down and drag the cursor to an input port of another module. Each port has an indication of what format is expected (such as raster, vector, etc.). Therefore, some compatibility checks are performed to see if the link can be created.
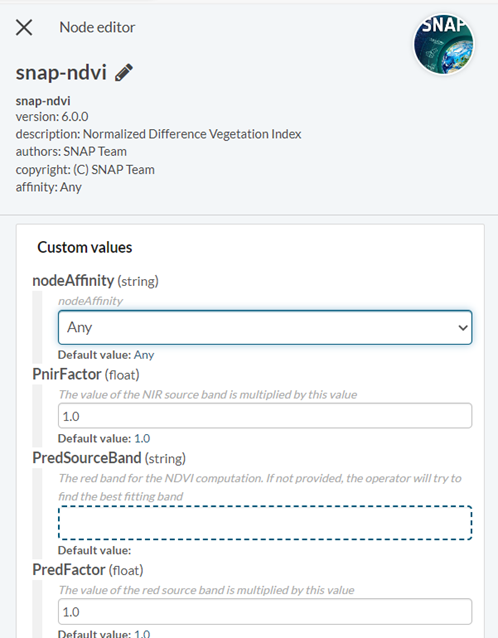
Parameters of a module can be edited by clicking the pencil icon of a node. They are displayed in a pop-up docked to the right of the canvas:
A node can be removed from canvas by clicking the bin icon on the node.
Start execution
Before the workflow is actually submitted for execution, the action displays a dialog in which you have the possibility to select the input of the workflow (if not done so in the workflow editor), to change the values of parameters of constituent modules, and to assign a label for the execution:
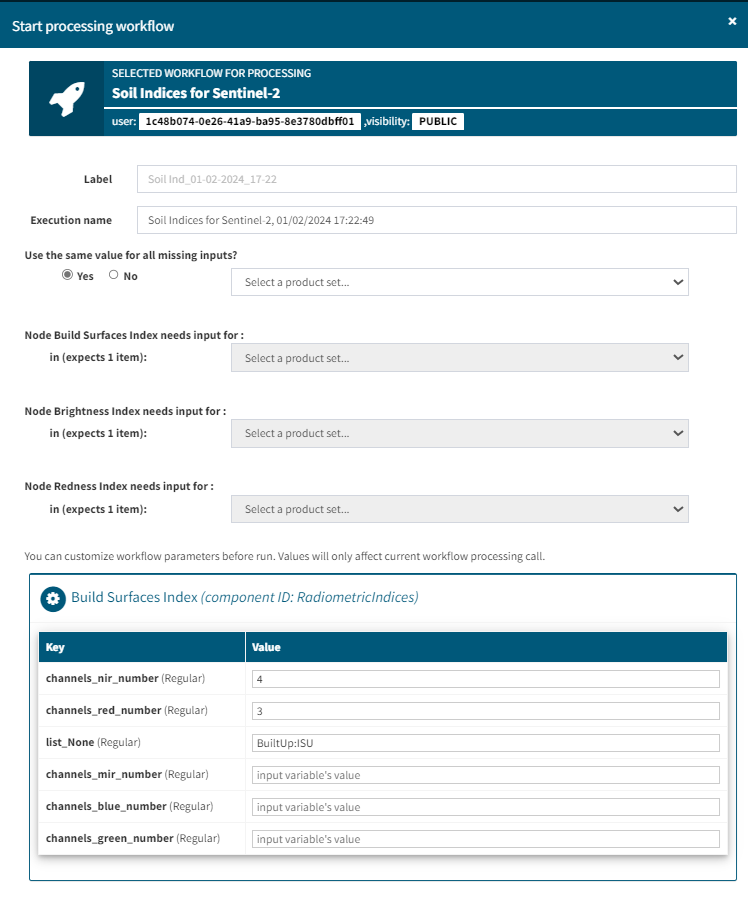
Once you are done with any changes, you submit the workflow for execution by clicking the “Process workflow”.
The workflow execution may not start immediately. Since the platform has limited resources and it is used by many users, the tasks to be executed are placed in a queue. Then, based on the availability of resources, they are dequeued and the execution begins on dedicated VMs (depending on your quota).
You can follow the progress of the execution on the Dashboard page, in the Running Jobs section. Once the execution is complete, it will be moved to the Executions History section.
The end results of the executions will be saved in the Local repository and moved to the S3 bucket. The intermediate results (if any) will be deleted.
¶ Remote Services
Remote services are actual clients for external web services operations. The web service definition is done by an administrator. In this section, you can opt to create processing-like modules based on these external web services.
Currently two types of remote services are supported: WPS (Web Processing Service) and WMS (Web Map Service).
To add a new remote service, you select the tab you are interested in and click the “+” icon:
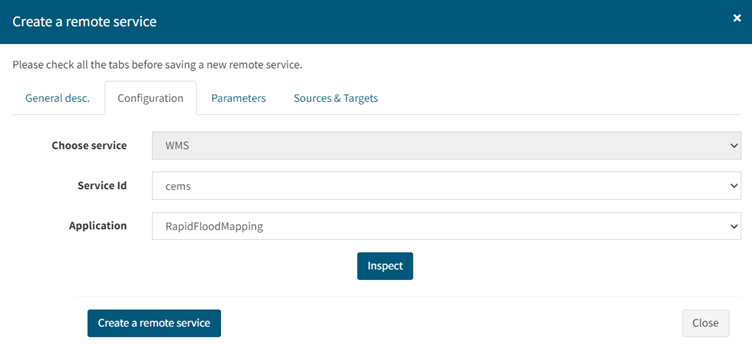
The list of available remote web services will be displayed in the Service Id dropdown. By selecting one, the Application dropdown will display the operations available on the remote web service.
Once selections are done, you click the Inspect button and after a few seconds, the Parameters section will be populated for the selected application and the Sources & Targets section with the output description. You can change their default values and click “Create a remote service” to create your component.
It will appear in the list of remote services for the selected tab:

Here you’ll have several actions:
• Edit: you are taken a form similar to the above one and you can edit parameter values.
• Start execution: you invoke the remote operation. Before the actual invocation, you must provide values for the parameters (if not done so before) and to select a site (because these types of services require an AOI):
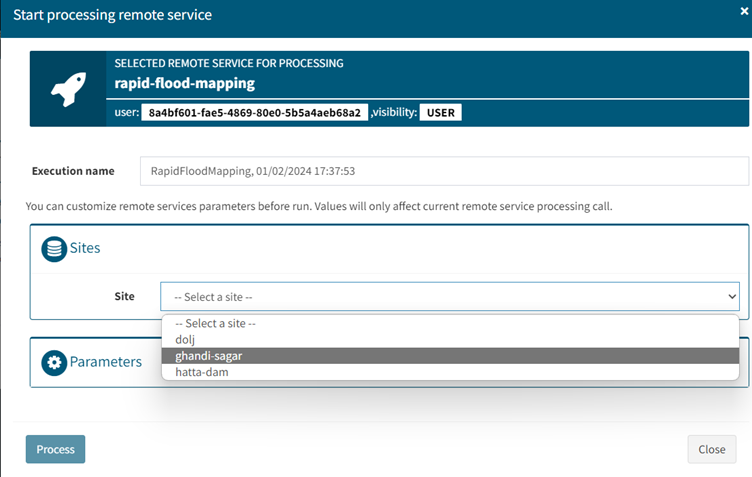
Then you can click “Process”.
If everything went well, after a while (depending on how much time the remote application will take to complete) the result (if the call was successful) will be found in your Local repository, in a folder matching the value of “Execution name” from above.
¶ Scheduled Jobs
A scheduled job is a time-programmed execution of a workflow.
You create a new schedule for a workflow by clicking “+” button:
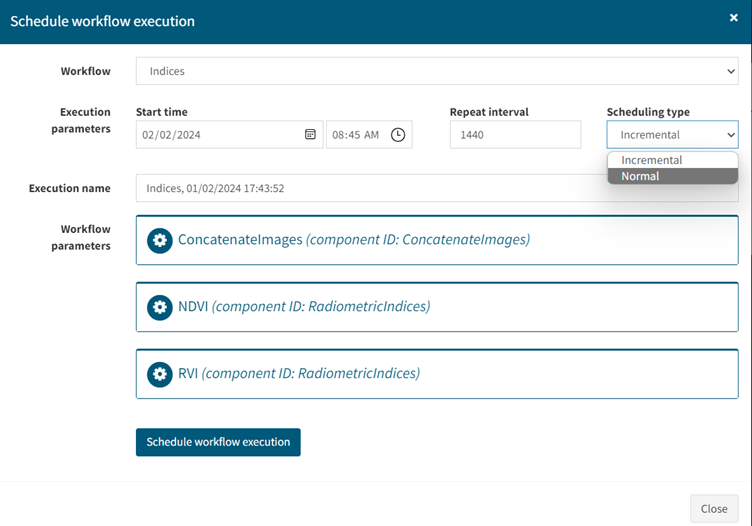
In the form that will be displayed you will:
• Select the desired workflow in the “Workflow” dropdown.
• Choose the start time (first execution time)
• Enter a repeat interval (in minutes)
• Choose a schedule type:
o “Normal” means the workflow will be executed each time with the same parameters.
o “Incremental”: this type works only for workflows that have a saved query as input. The first time, it will run the query with the existing startDate and endDate parameter values. The subsequent times, startDate will be replaced with the previous endDate and endDate will be incremented by the repeat interval amount.
• (Optionally) Enter a name for the schedule name.
• (Optionally) Modify the parameters of individual modules.