Here you can find information about how to use the Dunia Application Hub.
If you have the data you need, we’ve put together the tools to process it as you like. In the Application Hub you can find modules from SNAP, Orfeo Toolbox and other toolboxes.
¶ My datasets
The data in your private workspace is in “My Datasets” section:
You can use the data from one of the dedicated datasets. Since we’re close to these datasets, you don’t need to download your EO products of interest, they are just “linked” to your workspace. The path to eodata mounts is `/home/eoafrica/eodata/`
¶ What if I don’t find the data I need in the dedicated datasets?
You don’t have to worry about, you can always search for EO products not locally available in the “Search” section:
Here you will find additional collections that can be searched, grouped by sensor type:
You can filter these (use the filter icon in the dialog title bar) by provider, by collection or by the sensor type (category):
Once you have made your choice, you can start parameterising your search on your site, do the search, choose one or more results that suit you, and download them to your workspace.
Note: Be aware that, by doing so, the size of the results will count towards your storage quota.
¶ What is a “site”?
You can always search for EO products by drawing on the map, each time, the same area of interest. But wouldn’t be simpler if you could reuse the AOI and the temporal interval? You can do so in the “Sites” section:
A site is just a name for a pair of an area of interest and a temporal interval that you can choose later in the Search area.
¶ Where do I find the data to work with?
Ok, so you retrieved your EO products. But where are they? Let’s inspect the “Repositories” section:
A repository is a place where files are stored, and you can browse it in an Explorer-like manner. You will find two such repositories: a “local” one and a “swift” one.
The “local” repository is where you find your EO products:
You can perform various operations here. You can:
- Upload additional files
- Create new folders
- Copy & paste items (this also works between repositories)
- Delete files and folders
- Create product sets (see next section)
- Lookup a folder for EO products (of known formats)
- See metadata of items
- Visualize EO products on a map
- Filter the files by free text
- Or perform some action on a file or folder. Depending on the context, you can: convert a raster to cloud-optimized GeoTiff, convert a raster in the Zarr format, zip or unzip, or move an item to another location in the same repository.
¶ What is a “product set”?
A product set is what its name implies: a (small) collection of products that will serve as input for your processing. A product can be part of many product sets, and a product set can have many products.
¶ What can I do with my data?
Your product sets are now ready to be processed. A workflow is what will be used for doing so. It is a sequence (or graph) of one or more connected processing modules that will produce a result. You can use one of the pre-defined workflows, or you can build your own workflow.
¶ Use one of the pre-defined workflows
You can find some simple workflows for computing common vegetation, water, or soil radiometric indices. We will keep updating this collection of workflows with others of interest.
¶ Build my own workflow
The workflow editor is a canvas where you can drag-and-drop processing modules from the left toolbox:
The modules are grouped by category and have:
- one or more sources (inputs) depicted with blue squares
- one or more targets (outputs) depicted with orange squares
- parameters that you can edit by clicking the pencil icon
Modules can be connected with links between a target and a source. You must be careful not to leave unconnected modules on the workflow, as this may have unwanted side effects.
¶ ... and then?
Once you have build your workflow (or chosen an existing one), you can run it:
You need to specify a product set as input for your workflow if you haven’t added a product set to your workflow definition. After this, you just launch it.
You can follow its state in the “Dashboard” (the landing page of the Application Hub), in the Running Job section:
Here you can see how things are progressing and, once the job is done, it’s already history (in the “Executions History” widget). The results can be found in your local repository.
If you want to keep them, there is just one more step to take: you need to move them to the “swift” repository. This is the location of your persistent storage (think of it as a read-only storage) that is also available in the Sandbox environment. To do this, go to your local repository, find the results, select them, click the Copy icon in the toolbar, navigate to the Swift tab, select an existing folder (or create a new one), and click the Paste icon from the toolbar.
¶ Publish my data or workflow for the Soko Marketplace
¶ Share Data
To share data in Soko Marketplace, go to the Application Hub and open “My Datasets” as described here.
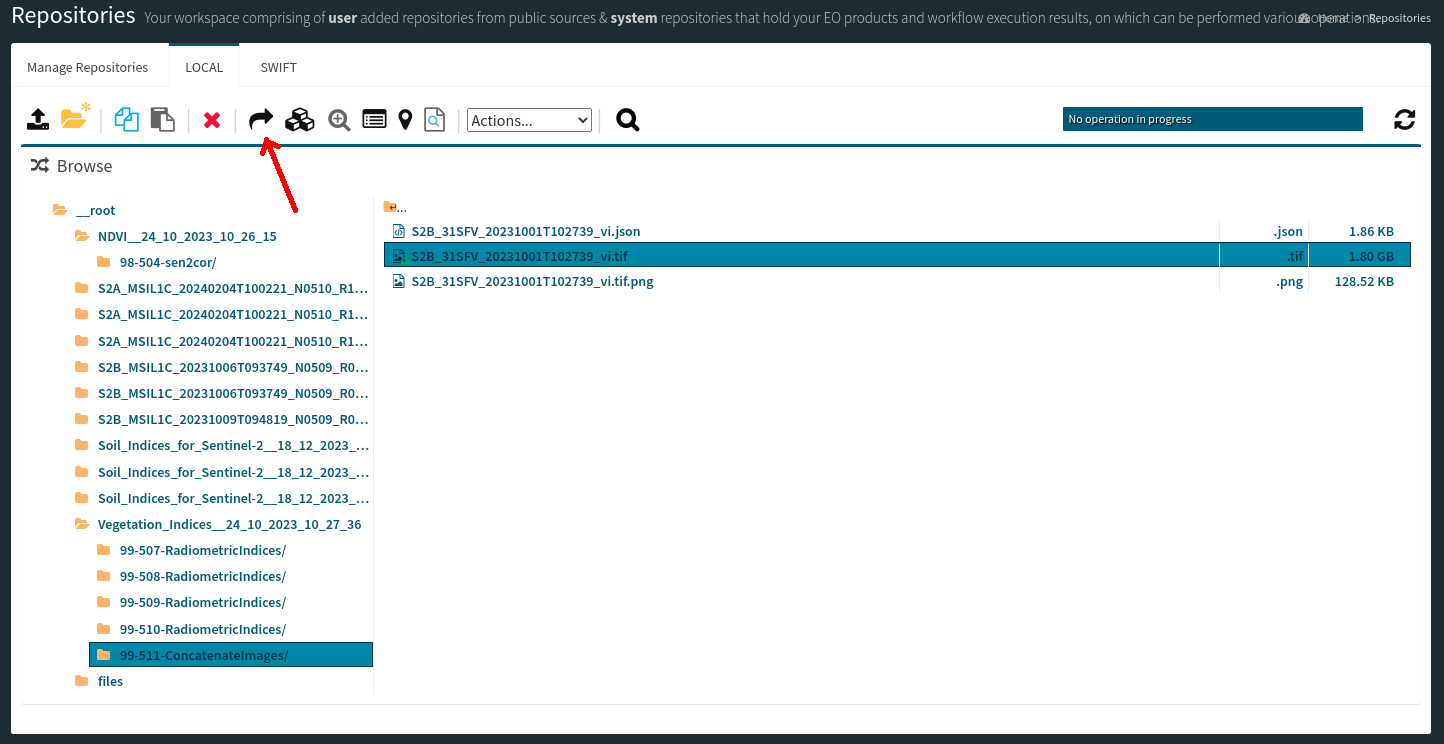
Next, select the directories or files that you want to offer and click “Share product set” (black error that points to the right).

Now you can switch to the “Shared Datasets” section to ensure that your dataset was successfully shared.

¶ Publish Workflows
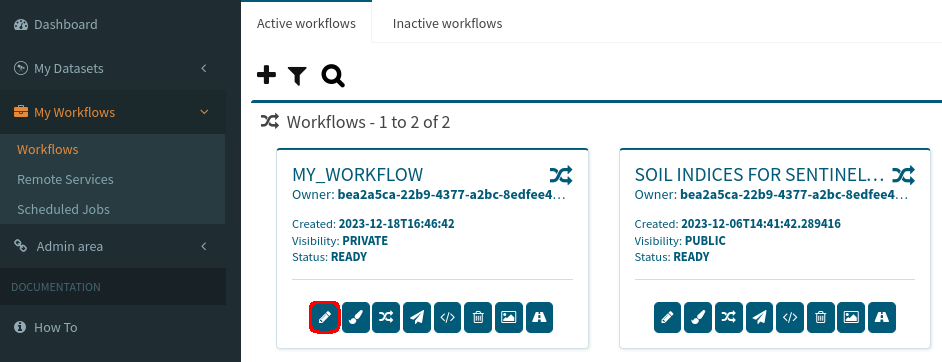
To share applications in Soko Marketplace, go to the Application Hub and open “My Workflows”.

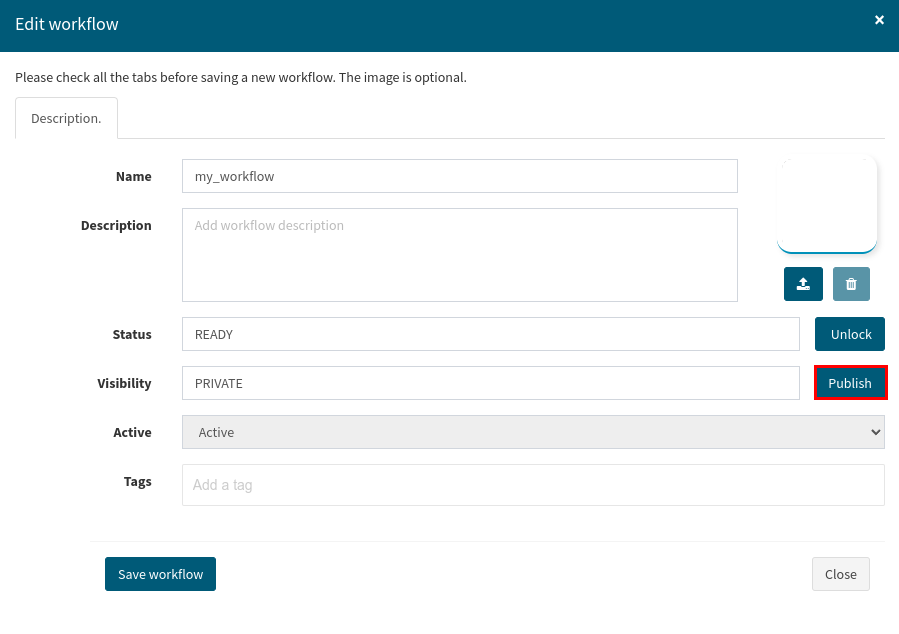
Now, click the Edit button (pen symbol) to Lock the workflow you want to offer as follows:

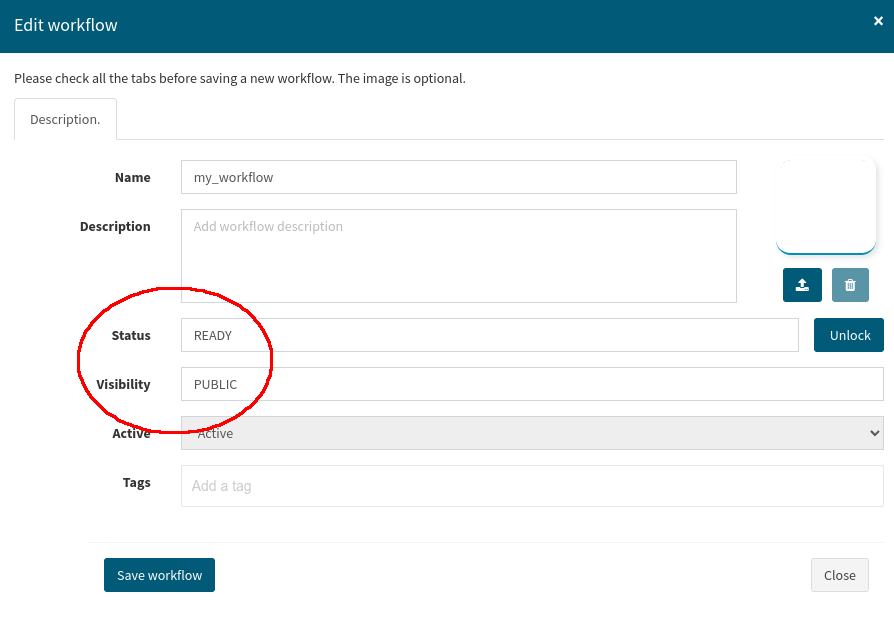
You can now see that your Status has changed from “DRAFT” to “READY”. As a final step, click on the “Publish” button.

Your workflow is now ready and publicly available. As a result, it can be selected in your new Soko Marketplace offer.
